Tuesday 31 May 2011

Communication: Improving the usability of my blog

An obvious (now I’ve read it) idea suggested by one of the tutors in the OCA student site is to use categories to make it easier to keep track of postings. Not sure it would have made much difference to my DPP blog, but this one is different as so many of the exercises cannot be easily completed in a single session.
So now I have a key themes box in the side bar. I’m trying to avoid too many categories so am restricting myself to a few broad categories. Obviously there’s one for every Exercise and Assignment, then there are book and exhibition reviews and a few less obvious categories:
  • analysis – for reflective or analytical posts;
  • archive – posts that make major references to photos from my archive – something I do when I haven’t been able to get out shooting, or just feel like adding some more material for discussion;
  • blog contribution – posts which link to my contributions elsewhere;
  • events – particular events I’ve photographed – usually with some reflection tying them to what I’ve learned;
  • inspiration – posts which link to sites or contain inspirational images, interesting techniques, or thought-provoking comments;
  • photographers – short reviews of photographers I find interesting;
  • place – posts that are about ‘place’ rather than ‘people and place’ and don’t really relate directly to an exercise;
  • self-portrait – self explanatory. Still considering a portrait category – but so much of the blog to date is about portrait that it hardly seems helpful;
  • street photography – for my attempts at the same. Thought I’d give it a separate category as it wont all be directly in response to the exercises;
  • Support material – general info that doesn't fit with the exercises but I found useful or interesting anyhow; and,
  • Technique – posts where the primary interest is largely technical.

Sunday 29 May 2011

Exercise 10: Moment and Gesture – Another look in the archive

Another dismal day scuppers my plans to go into one of the nearby tourist hotspots for a go at this exercise, so in a bid to retain some momentum I’m going to dip into my archive again.

As the notes indicate there are two ways to try to capture the ‘moment’ which could perhaps be paraphrased as ‘machine gun’ or ‘sniper’. The first involves taking several shots in quick succession – or perhaps just even a huge number of shots -and picking the best, the second involves learning to anticipate the moment and catch it with a single shot.

Machine Gun

A couple of examples – first up this selection from a horse race at Cheltenham which I took in May 2007:

Cheltenham races

These are not the greatest shots in the world – my view was obscured by the rail and this part of the course was in shade against bright sunshine in the background, but there is enough here to illustrate a couple of things.

  • The camera was firing at about 2 frames a second. With a shutter speed of 1/640 it captures less than 0.2% of the action. Even at 10fps it would only capture 2%. So getting a ‘decisive moment’ is not guaranteed.
  • Within the 2-2.5 secs of the sequence above there are very distinct poses, some of which are more successful than others. The first is quite static – the horses legs are more or less four-square. The second has a sense of urgency – the legs are in the classic galloping position and the rider is starting to rise from his seat. The third has the rider in a nice position, but the horse looks as if it is falling forward. In the fourth the leg position is reminiscent of old-fashioned paintings, and in the fifth it looks like the horse is trying to slide to a halt. For me the second shot is the most effective – whether it is possible with practise to anticipate this moment rather than machine gunning for it I’m not sure. I suspect it is.

In this second example I am still using the continuous shooting mode. This one differs from the last in that Ashley was modelling for me, and I had an idea of the type of shot I wanted before I started, so in some ways this also relates to Exercise 6. As with the horse above, it was difficult, at my level of skill, to anticipate the key moment so I had, to some degree, to rely on chance.

Jumping series

The best shot (middle of the third row) catches the event well I think. The alternative way to obtain this would have been to ask Ashley to repeat the jump several more times while I concentrated on getting a single shot at the peak of his jump. This may have worked reasonably well because there is a moment of relatively limited motion at the top of a jump. This is the kind of technique I have classified as ‘sniping’.

Top of the Leap


Sniper

For the next couple of shots, taken at an outdoor event in 2009, I was trying to capture expression a shot at a time, while trying to get a range of expressions.

      Lakes Alive; Maryport 2009        Lakes Alive; Maryport 2009

The first – if I recall accurately – was rather easy because it was the finale of a particular trick and the guy in the red shirt held the pose for a couple of seconds, the second was a mix of anticipation and chance. The risk of this approach is that you only get one chance to get it right, so that the following shot has clearly missed the moment because he blinked as I pressed the shutter and the hand position is wrong. I think it likely that I would still have missed the shot with a machine-gun technique, although I shall never actually know.

Lakes Alive; Maryport 2009

Summary

Machine gunning or sniping? It seems to me both have their place although for my own part I’m not totally convinced by machine gunning. For fast action sequences – particularly if they are repeated it seems likely to give a good chance of results, although depending on the activity it may be as effective to concentrate on the single shot. For more general shooting good results can easily be obtained by trying to anticipate the moment – indeed the sound of the continuous shooting mode may be unhelpful in some situations.

Saturday 28 May 2011

Communication: written and online learning logs

Have been wondering for a while if I’m doing myself a dis-service having only a Learning Blog, in part sparked by the recent videos on WeAreOCA, and in part by some reflections on what the communication part of the course is about. This blog feels just right for writing up exercises, reflecting on feedback and capturing links to interesting websites. It is just about manageable for book reviews and exhibition reviews, where there is some online material to point at, but it feels wrong for just capturing completely random thoughts, brainstormed ideas for projects, magazine articles etc.

While reading through the student-only forums I’ve also happened upon these quotes from Jose Navarro, which seems to support my concerns.

Bear in mind that even though the learning log only weighs 20% of the final mark, it is a submission requirement and needs to conform to a model which contains:

  • coursework - projects and exercises
  • self-reflective comments, follow up work in response to your tutor's comments
  • additional learning and research materials - magazine articles, exhibition brochures, newspaper cuttings, etc...

1&2 are done in blog format, 3 as a traditional physical document folder.

and a second:

would suggest that you keep both an online blog and a physical learning log. You would then make the most of both `worlds´ and also maximise your chances to impress the assessors.

a) online blog - excellent solution for logging coursework and assignments. You can also update it easily and add personal self-reflective comments - a key component in any learning log - anytime, anywhere.

b) physical learning log - a folder with additional learning and research materials which would otherwise be tricky and time consuming to scan and incorporate in your logbook - it would be an unreasonable use of your study time as well.

So in my opinion it´s not a question of choosing between an online or a physical learning log but figuring out how to make the most of what each platform is suitable for.

So, out with that little notebook that came with the course material.

Sunday 22 May 2011

Book Review: Train Your Gaze – Roswell Angier

From the minute I opened it up this book felt different. Even in paperback it oozes class – the photos are well produced, the paper quality is high and the layout is clear and well thought through.


So what is it? Well, anyone buying it to learn the technical side of portraiture is going to be disappointed. Yes, there are some short techie sections at the back, but if you want to learn about depth of field or 3-light set-ups for portraiture this is not the book you need.


If, on the other hand, you are reasonably competent with the technology, and want to explore portraiture as an art form more deeply, then this seems like a good place to start. The book is divided into 12 chapters covering areas such as self-portraiture. voyeurism, darkness – each with a thoughtful assignment intended to help you explore your own feelings in the area concerned. Each chapter explores its subject by analysing the meaning of and thought processes behind photographs from a wide range of artists covering the period from the very beginning of photography to the present day (more or less). I doing so it points up some interesting contrasts – for example the opening chapter starts with and Avedon photo and then moves to Cindy Sherman via Julia Margaret Cameron.


One of the key achievements of the book for me was its accessibility. Angier writes in a free flowing style, largely free of the jargon and complexity that seems to haunt the photo theory texts I’ve read to date. This is most obvious when you compare his style with some of the many extensive quotes he provides.  Fortunately these are in the minority because the quotes themselves are another strength – especially those from the photographers whose shots he is discussing.
One thing that particularly strikes me is the number of photos in the book that require some understanding of the background before they make sense – which perhaps highlights the difficulty of analysing any photo in isolation from its home body of work and plays to the debate about whether artists statements are good or bad. On the evidence of this book I’ll go with the ‘good’ camp – I don’t want to be told what the photos mean, but it is certainly helpful to understand the context.


The over-riding idea I was left with after reading the book was, interestingly, not about portraiture per se. It was the analogy, introduced in the ‘Confrontation’ chapter, with Herrigel’s ‘Zen in the Art of Archery’ – something I’d already picked up myself earlier on in the discussion of decisive moments. Freeman also uses the same analogy in his book ‘The Photographers Eye’. Freeman uses it in the context of photographers having a, perhaps subconscious, repertoire of photo situations that we can draw on at very short notice to help us with composition etc. If nothing else, a good study of this book will help develop that sense and if, like me, you are keen to take your photography beyond the limits of the usual ‘how-to’ books, then Train Your Gaze is well worth the money and time you invest in it.

Thursday 19 May 2011

Monday 16 May 2011

PnP Exercise 11: Standing Back

Went in to Keswick today to have a go at this exercise. Wasn’t really expecting much luck as it was 16:00 when I got there and a drizzly Sunday afternoon. My rationale for going there at all was to try to make the situation more comfortable – people in Keswick are well used to tourists with cameras shooting everything.

In truth the combination of long lens and less intimidating circumstances worked a treat and I felt very comfortable shooting. I produced about 40 shots in the hour or so I was there, which felt like a reasonable number, given that people were a little thinner on the ground than usual. I had my 50-200 zoom on the E-3  (100-400mm in full frame equivalents) and as suggested in the exercise used it at the longer end as well as the shorter end. The camera was set to ISO 400 to help maintain a reasonable shutter speed in the dull conditions with the aperture mostly at f/4.5.

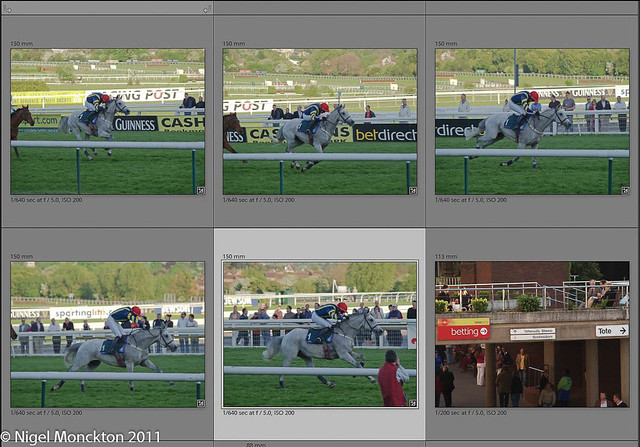
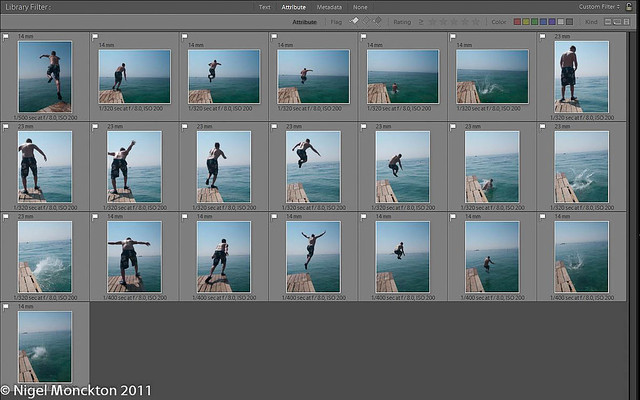
I pulled the best 8 together for this blog:

PnP11-1

In this one I was attracted by the dog straining at the leash, and the women in the shop watching its antics. Focal length 76mm/152mm equiv. The longer focal length, and the fact that there attention was distracted meant they were unaware I was taking this shot.

PnP11 - 2

This shot, at 200mm/400mm equiv. would have been unavailable without the telephoto – there was a hedge in the way, and even without it by the time I had got closer the shot would have been gone. This is the kind of thing the British seem to excel at – going on a weekend break to play pitch and putt in the rain.

PnP11 - 3

I thought the reflection offered some potential in this shot – not quite sure that it works but thought I’d include it here as an example of an experiment with reflections. (88mm/176mm equiv.) In truth I could have done this with a variety of lenses.

PnP11 - 4

Without the long lens I’d almost certainly have lost this opportunity – simply through not wishing to intrude too closely. It’s quite a nice shot, although had I been a bit quicker I’d have caught them adjusting each others hoods so their faces would have been visible. (137mm/274mm equiv.) This seems to be a forte of the telephoto for street shooting – when there are relatively few people about it gives you greater reach, if you can spot the opportunities.

PnP11 - 5

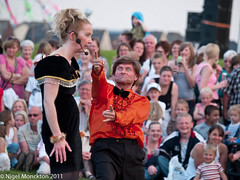
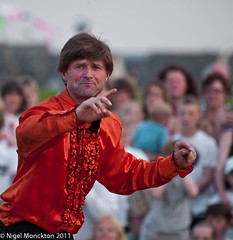
I should perhaps have included this for Exercise 10 – Gesture and Moment. I missed the exposure at my first attempt (quick glimpse at the blinkies on my screen told the story) and grabbed this second shot within a few seconds. This is a much better composition – the legs and arms are synchronised and the heads and the candy-floss line up nicely (158mm/316mm equiv.)

PnP11 - 6

This one was too good to miss – love the colour scheme and the fact that her head is invisible. (117mm/234mm equiv). I could have managed this one with a much shorter lens  as she maintained this position all the way down the road past me.

PnP11 - 7

I took several successful portraits at this cafe as I wandered up and down, generally with the lens more or less at full stretch to improve framing. I’m pretty sure this lady twigged that I was photographing her – although I was a good distance away. (183mm/365mm equiv.)

PnP11 - 8

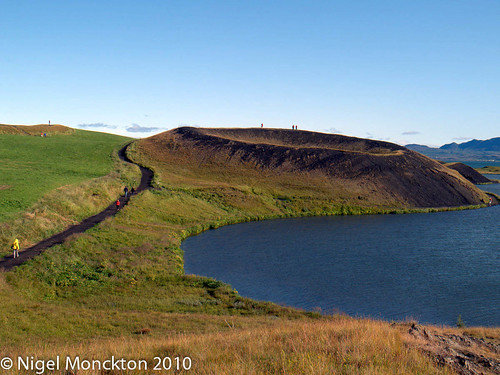
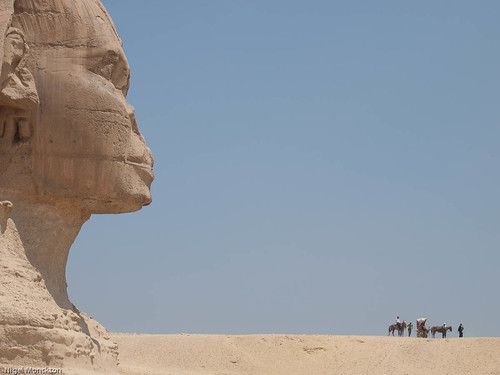
I’m going to finish with a shot that’s not about people. This would certainly be un-obtainable without a longish telephoto, and reducing the aperture has enabled me isolate the subject more effectively. It would be less of a shot without the people in the background, but the blur helps direct the attention to the true subject. (200mm/400mm equiv.)

Conclusions

I certainly shot more freely with the comfort blanket of distance/relative anonymity, and the camera friendly surroundings. In spite of the relatively large size of the camera and zoom I never felt I was attracting attention.

Other advantages of a longer lens include the ability to reach shots that would otherwise have passed – such as the golfers and the two friends – and the ability to isolate the subject with depth of field. Set against this is a sense of being an observer, rather than being involved and a number of practical difficulties. These include the need to maintain a high shutter speed to reduce camera shake – I lost a few potentially good shots this way – and the tendency for people to pass in front of the lens at key moments. This latter would be particularly troublesome on a busier day.

Follow-up

I’ll have to try this long lens approach in Carlisle – which is busier and less touristy – and see if I have the same results.

Wednesday 11 May 2011

Exercise 9 - again: On the underground

On the underground by nmonckton
On the underground a photo by nmonckton on Flickr.

Nearly forgot this one - I think this was actually my first conscious attempt at a 'street photo' having read through the course material. I just spotted the juxtaposition between the lady and the newspaper headline and couldn't resist.

Place - Maryport

As this blog is about People and Place it suddenly occurred to me that the following is of relevance. Produced it a couple of years back as a personal reaction to Maryport. You wont find any people in it - as I observed in my previous post my photos have until recently been largely uninhabited - that's one of the reasons I took this course. Hopefully it provides a sense of place though.

Tuesday 10 May 2011

Exercise 19: Single Figure Small–a quick look in my archive

It was only when I was looking through my photos searching for examples of this approach that I realised how few of my photos actually contain people in any meaningful way. You could be forgiven for thinking that most of the places we visit on holiday are largely uninhabited except by members of my family. In fact, for the most part, the only way I use non-family in my photos is small – usually to give a sense of scale, and very occasionally as the subject or as a key part of the image.
These two from Iceland are about sense of scale – in fact the central people are so dwarfed by the landscape they are hardly visible.
Pseudocrater adjacent to Lake Myvatn, Skútustaðir
Dettifoss 

Use of an extreme wide-angle lens can exaggerate the effect of a small figure as in this picture – where the wide angle makes the building – which was already large -appear relatively larger by reducing the prominence of the figure. Somewhere in Egypt - I'll work out where soon

Then there are a few examples of a small figure being used in the way that the course notes suggest as an accent in the picture. These two would be nothing without the people.
Luxor - from the cruise boat Nile Cruise

Another example from my archive of using a person as an accent is this sunset shot – again I feel this picture would be pretty non-descript without the inclusion of the figure – tiny though he is. I had to be quite patient with this shot to wait for him to wander along the beach to the intersection of the shoreline with the highlight from the setting sun.

Looking towards Criffel from Maryport Prom

And finally, another shot from Egypt. I’m quite proud of this one as it got me to the finals of the Wanderlust Photographer of the Year competition (Travel Icons category). Technically it’s not ‘single figure’ but it clearly fits with the idea of a relatively small human presence making a significant difference to the shot. Without their presence this would simply be a rather oddly composed shot of the Sphinx.

The Sphinx

Sunday 8 May 2011

Daido Moriyama

The official Daido Moriyama website can be visited by clicking the link below. Note that it contains a lot of flash content and will be slow to load if your broadband is as crummy as mine. :(
Daido Moriyama official web site|DaidoMoriyamaPhotoFoundation
According to Wikipedia Moriyama is renowned for his high-contrast black and whites of the less attractive bits of Japan, and his official website certainly bears this out – although he takes some high-contrast b/was of the less attractive bits of New York as well. His technique – which according to this site is to underexpose at high ISO then overdevelop to produce a very high contrast, grainy end result – is perfectly suited to much of his subject matter. In fact, I’m left wondering if some of the shots would have nowhere near the ‘under-belly’ feel if the film had not been so harshly treated.
To me his shots illustrate the sterile nature of a lot of debate on camera forums about lens sharpness/pixels/ISO etc. It seems the secret is to understand your equipment and use it to deliver your vision. Moriyama’s work is interesting in part because of the imperfections and because of the way they gel with his chosen subjects.

Update (03 June 2011): Found a brief interview with Moriyama here. A couple of points worthy of note are that he continues to produce work on film - which I guess best suits his style, and his more recent shots offer more 'clarity' than his earlier work. From the interview it seems clear that he is trying to produce photos of what he sees as the real Japan, perhaps even trying to strip away a veneer to show the real thing.

A second attempt at Exercise 9

Went into Carlisle today with the intent (apart from getting new tyres) of nailing Exercise 9, but it clearly isn’t going to be that simple.

The biggest problems seem to be (for me anyway) – closeness and interest. I’m guessing that I’ll get used to the former, it’s just a case of practise and developing some confidence, and maybe the latter will improve with time. But, and it’s a big but, I can’t avoid the feeling that large numbers of people wandering around shopping offers little of interest to me – I don’t particularly like doing it myself, and photographing other people doing it runs a close second to watching paint dry. This may explain why I don’t press the shutter often enough. Perhaps the answer lies in the name of the exercise – a comfortable situation.

Anyhow, I did come back with some shots that I’m prepared to show, the first two of which I felt worked better in B&W using a preset I found here. (On a related note – the source says it’s supposed to replicate the look of Japanese photographer Daido Moriyama – I’ll be looking him up later)

The first I liked because of the position of the ‘To Let’ sign:

To let

and the second because of the irresistibly grumpy look on the old chaps face.

E5070289.jpg

The next two seem to work better in colour – in the first I simply like the bright colour, and alignment of the arm with the heads appearing further down the street, the second speaks for itself – it’s quite a heavy crop because I saw what was happening and didn’t have time to get closer.

E5070290.jpg

E5070306.jpg

Conclusions

I think I opened with the conclusions from todays shoot – this isn’t as easy as it seems. It seems to me that it would be easy to get hung up on this exercise and not move forward. To avoid this I’m going to keep revisiting it while I progress with other parts of the course.

Tuesday 3 May 2011

PnP Exercise 14: An organised event

Have concluded that the only way to make progress on this course is to adopt the spirit of street photography by going with the flow and taking my chances as they occur. So next up is ‘An Organised Event’ because we had a village party to mark the Royal Wedding. This was a mix of ‘people aware’ and ‘people unaware’ and I was also on a mission to get a village photo for the local paper.

The evening posed a variety of challenges – we started with bright contrasty sunlight and games on the village green,  and then in fading light we moved to a dimly lit barn for a few drinks and supper. I didn’t want to carry vast quantities of kit, but a flash was inevitable, so for anything candid it was a case of patience and guile. There was also the challenge, since I’m preparing a CD for the village, of trying to ensure I captured everyone present. And finally – I was supposed to be enjoying myself!

I shot with the E-3 and a 14-54 zoom (28-108 equivalent), and the PEN with a 17mm (34 mm equivalent) swopping the flash as required.

I finished with around 120 shots for the CD – and a few others which I’ll share privately with the subject. For the purpose of this blog I’ll add a selection here which show the range of shots I produced.

First up a couple of character portraits with people I knew fairly well:

Village party 1        Village Party 3

And then on to the green for some games. the first of these three is a fairly straightforward shot, in the second the couple in the background watching the two boys caught my eye, and the third was an attempt to catch the spirit of the impromptu rounders match.

Village Party 4    Village Party 5     Village Party 6

Then a couple of happy accidents. In the first I feel that the real subject is the chap in the background, in spite of the foreground figure being larger and sharper – which feeds into something I’ve been reading in Angier’s book about the need for the subject to be in focus. The second is in the barn, when for some reason my flash failed to fire properly – I think it provides a nice semi-abstract of the partying. In the final one my daughter has still not really explained what on earth she was doing, but it does make for a fun shot.

Village Party 2   Village Party 7   Village Party 8

Finally a couple of village shots – the first of the sports, and the last a more formal shot for the local paper which I took from a tripod so that I could dash to the back and be in a photo.

1000/433       Village Party 9

Thoughts and reflections

In some ways this was relatively easy on me, in the sense that I was at least passingly familiar to most of the people there (I could scarcely gate-crash a party full of complete strangers) – although turning up at such an event with relatively fancy kit does create some expectations of output so there was pressure of a different kind.

There was still a need to generate some rapport with the party-goers as some were a bit camera shy.

A large dark barn tested the limits of my kit – it required direct flash, which is always difficult to make attractive.

The wider angle was particularly helpful in the barn, and the 17mm on the PEN was my most widely used focal length (although I took more shots with the E-3/zoom combination) sometimes giving a feel of being involved in the action, and at others giving the impression of being stood back, when in fact I was surrounded.